Friday, June 14, 2013

Welcome Summer!

Wow! I can't believe my last post was over a year ago! I apologize for my absence, but I have gone through a complete renewal. I decided my life needed some change and so I became a high school teacher, teaching what I truly love, photography & TV production. With a new career came many changes  and so Sinfully Crafty had to take a back seat for a while. 

The best part is that it's now summer and I have 2 months to be completely creative! One of my first projects is to sort through all my photographs and start picking out my favorites for the year. Here's my first selection.
 
 
This past year, my daughter's Girl Scout Troop participated in a scavenger hunt commemorating the 100th anniversary of Girl Scouts. One of our locations was a park, and of course the girls went straight to the playground. I love the angle of the see saw and how the colors red and purple pop up. For a little flare, I added some word art from Ashe Designs.

Monday, January 16, 2012

Family Fun

This year I have decided to concentrate on working on my photography. For about half a year I have been following a website called I heart Faces. It's a weekly photo contest! I don't really know why I haven't entered before...but here it goes. This week's theme is Family Fun, so I decided to enter a picture I took at the beach this past summer. What do you guys think?


I've been holding a camera it seems like since the day I was born.  I learned photography in a world where Artists used 35mm cameras, developed the film in a can and printed their own photographs. I was taught that a great picture needs no editing, and that's what I try to do when doing photography. However, it is a new millenium and one must change with the times. I'm working on mastering my digital Canon like I had mastered my 35mm version. I have also learned photoshop and while I will work on pictures for clients, I like my pictures just the way they are, with movement, dark spots, highlights, etc.

Monday, January 2, 2012

Happy New Year!

2012 is the year for you to get your sinfully craftiness on! I promise this year to try to post at least once a week...so here is my first entry for 2012.

I have been selling many of my photographs through my Etsy store, so I decided to make some videos showcasing them and give my clients some history regarding them. My first video features pictures I took in 1999 on my trip to England and Ireland. I went to Europe on a study abroad trip as part of my motion pictures degree. We spent 3 wonderful weeks oversees and I must say I fell in love with Ireland.

Photos in this video include Stonehendge, The Tower of London, the Cemetery in Glendalough, Ireland, the London Bridge, Shakespeare's Globe Theater, Hever Castle and the English Coast. I used a good old 35mm camera to take these and yes...they are originally black & white. Hope you enjoy the video!

Thursday, November 24, 2011

Hello Kitty

I finally had the opportunity to design a whole party package for a client. They wanted Hello Kitty invitations and centerpieces...so I put my Cricut to work! When using a cricut cartridge I use, Cricut Design Studio to design my projects. However...in the middle of working on this project, Provocraft released the new Cricut Craftroom, so I decided to try it. I love it! Much easier to use than Design Studio and it saved me a lot of time. I created a Hello Kitty card invitation and 10 centerpieces. Let me know what you think!


Saturday, September 17, 2011

The Pinkest Bra you'll ever see!

My sister in law asked me & my newphew to help her decorate a pink bra for her to display at her office for Breast Cancer Awerness month. She wanted it to be both wearable and be able to hang as a banner. After a 2 hours shopping spree at Michael's buying anything that was pink, here is what we came up with.

Thursday, September 1, 2011

The Cutest Model!

Just wanted to put up a little update regarding the hair clippies I made in the previous post. I needed to take some pictures for my Etsy shop and found the cutest little model to wear them. You Rock Sienna!


Friday, July 29, 2011

Hair Clippies

I found myself the other day with 5 minutes in which I actually had nothing to do, so of course I went to my craft pile, looked around and found some ribbon and a hair clip. Voila, the five minute craft project.

1. Materials, you'll need some ribbon and hair clips. You'll be surprised how little actually ribbon you need. I used about 2 inches of ribbon per hair clip. I used hot glue, but fabric glue or even crazy glue can work.


2. Start glueing the ribbon from the inside of the hair clip as shown.


3. Keep glueing the ribbon around the hair clip. I like to glue it to the inside of the back part as well. 


4. Add your embellishment. I used a really small piece of red ribbon I found laying around to do the little bow.  Voila! you have adorable hair clippies and all of 5 minutes to create.

Here's another set I created !


Thursday, July 14, 2011

It's a Girl!

Today I wanted to share with you a birth announcement I made for a couple who was waiting for a beautiful baby girl. They opted for a fill-in version of a birth announcement. I thought it was a great idea! I remember when my first child was born I wanted to create the most beautiful, over the top baby announcement. I took hundreds of pictures and had tons of ideas but with no time time to sleep, yet alone get on the computer, I never got around to actually making them. In retrospect, I wish I would have thought of making these fill-in baby announcements before the baby had arrived!

Monday, June 27, 2011

Sinfully Crafty's Featured Project

Today I begin my feature project segment. I thought about naming it the Project of the Week...but who am I kidding! So I'm just calling it Sinfully Crafty's Featured Project.

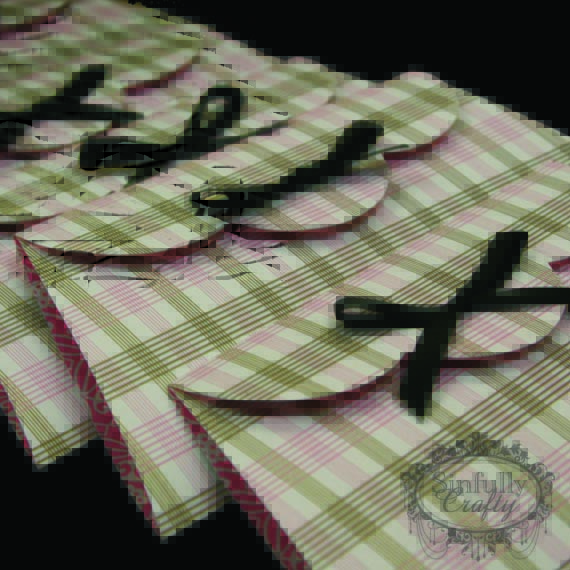
So let's get to it. The Sinfully Crafty's Featured Project for today is one of my most popular items in my shop. It's a purse invitation that can be used for a lot of occasssions, but the most popular theme seems to be Spa Birthdays. This invite is really cute and easy to make!

First you need double-sided printed cardstock or scrapbooking paper. If you don't have double-sided printed paper or would like a more custom look, just print it yourself! You will need to print on white cardstock so the image doesn't bleed through.

Next you will need to draw your template on one side of the paper and cut it out. ( I am still trying to figure out how to upload templates, please comment on my facebook page and I will email it to you)

Once you have your template, fold in three parts.

For the wording part you can type it on Word, print it on full sheet label / sticker paper, cut it our and place it on the inside of your card. Cut out to small hole to the flap part o fthe invitation and tie a small bow...Voila!

Another thing I like to add is a little peice of velcro to the inside of the card in order to keep it closed, however, do not use an entire  velcro circle becasue it really sticks together and makes it difficult to open. I cut a circle into 1/4's.

For those of you more crafty tech savy, you can cut out the invitation on a Cricut or other cutting machine, but I personally find I lose too much time trying to align everything. For me it's just faster to do the cutting by hand and then placing my wording on the invite rather than printing everything on the paper and then try to cut it on my machine. Of course, if you have a Cricut Imagine, you could use the machine to print and cut.

Thursday, June 16, 2011

A new look!

Every now and then it's good to redo your look, so I decided to revamp all the Sinfully Crafty Logos...let me know what you think!!

Here's the new logo


Logo Design Love: A Guide to Creating Iconic Brand Identities
Logo Design Workbook: A Hands-On Guide to Creating Logos

Friday, March 25, 2011

St. Patrick's Day Green

You must admit, I'm getting better at posting on time. I'm only a few days late on this one!

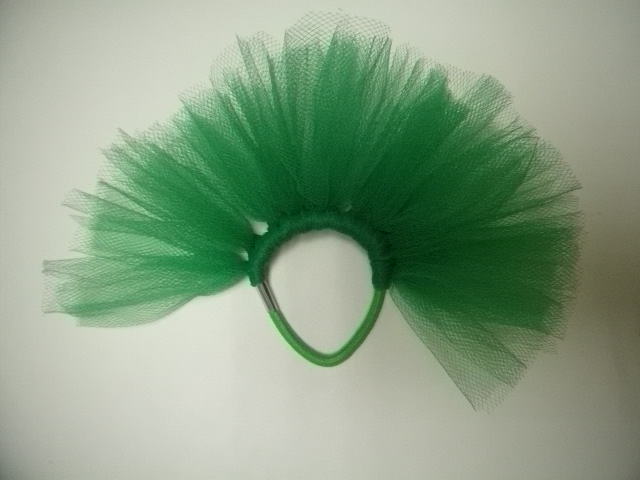
If you follow my blog, you'll realize that I post as creativity hit me, unfortunetly, creativity usually hits me the day before a major holiday or event as is the case with this year's St. Patrick's Day. I realized on March 16 that I needed to create something GREEN for me & my daughter to wear, after all, I wouldn't want my daughter to blame me for getting pinched all day. I went upstairs to my crafting corner and I saw that I had a tutu I made for my daughter to wear (how to make a tutu future post) and it had tons of green tulle & ribbon. I decided to recycle to the tutu. I took it apart and used the tulle and ribbon to make St. Patrick's Day ponytail holders.


In order to make these you will need:
1. 1 ponytail holder, preferably the same color as the tulle you'll be using
2. 6 inch wide tulle, cut into 6 inch long strips
3. and ribbon cut into 6 inch strips


You will strart to loop each strip of tulle through your ponytail holder. You can loop the tulle half way around the ponytail holder, leaving the bottom part open and easier if you are going to use it to actually tie your ponytail together.

If you are going to use it as decoration for your ponytail , you can go ahead and loop your tulle all the way around. You will only be able to loop it around once on the ponytail.
I love this project because it's fast and easy to make. Think of all the colors and or color combinations you can make these in!

Friday, February 25, 2011

Happy Belated Valentine's Day

It's still February and here at Sinfully Crafty we decided to celebrate Valentine's Day all month long (my excuse for not posting in a more timely manner, lolol).

In my last post I was trying to figure out what favors to do for Valentine's Day for my kids to take to school. Well, here's what my trusty new assistant Deya (more on her later) and I came up with.


Not only were these super simple to make, we actually finished making about 80 of these a week before Valentine's Day. The butterflies are about 5x7 and I printed them on Basis Pink Paper. You can't really tell in the picture, but due to the texture of the paper the colored swirls look like they were watercolored on.

I'm still trying to figure out how to post pdfs for you to download, in the meantime, if you want a copy of the file (without personalization) email me.

Sunday, January 30, 2011

Valentine's Day

Valentine's Day is coming up and when I only had 1 chld in school it was a breeze to make little favors for my daughter's classmates. Fast forward to 2011, I now have 3 kids in school and after staying up to the wee  hours of the night making Halloween favors for about 80 kids, I now have Valentine Day favor anxiety. My husbands says to just go buy those cheap cards they sell in the supermarket, but I actually feel guilty about doing that. If I can be creative for other people, while shouldn't I then be creative when  it comes to my kids! In comes Disney's Family Fun Website, they have tons of cute, creative projects which are every easy to make.

Last year I made these cute Valentine candy boxes and I personlized them with each child's name. This year I plan to do something different for each class so it's easy to identify who takes what favors.

Tuesday, January 18, 2011

Happy New Year

Wow! who knew 6 months passed so fast...I thought my last post was only a couple of weeks ago. Anyways, one of my new year resolutions is to update my blog weekly, or at least monthly.

I'm working on lots of exciting projects and I can't wait to share them with you!

Friday, July 30, 2010

I love feathers!

So I've had these ostrich feathers lying around my house for months trying to figure out what I wanted to do with them. Then on one of those afternoons when I'm aimlessly surfing the net I came across a yahoo video on how to make feather facilitators or a feather headpiece. EUREKA! That's what I was going to do with my feathers and here's what I came up with.

I was surprised at how easy the were to make. Basically it takes a feather, a small piece of felt, a hair clip and some kind of embellishment, I used a rhinestone button.

Ostrich Plume Feathers - 1PK/WhiteGlass Button 5/8'' Petite Petals Silver/Rhinestone By The EachYou take the feather and clip about 2/3 off. You only really use the very top tip, depending on how big you want your hairpiece. You the hot glue the feather to the small piece of felt. I arranged two feathers to make it a little bit more fluffy. On the reverse side of the felt you hot glue your hair clip. Please note to glue it correctly (I glued it on wrong 2 times in a row, lololol). The hair clip must be kind of sideways , going up so you can clip in into your hair in an upward motion. The final step is the embellishment. I took a rhinestone button and cut off the loop in the back. You then hot glue the button at the bottom of your feathers hiding the ends.
Here are pictures of what the back looks like.

I really love how these turned out...you might even see them on sale in my Etsy shop soon!

Tuesday, June 29, 2010

Happy Crafty 4th of July!

So it's that time of the year to celebrate our Great Nation's birthday, and what better way to celebrate it than with some great crafts (provided you do them indoors, under air conditioned conditions or else you might passout.)

The Disney Family website is always full of great ideas that the kids love it because all the crafts involve Disney Characters. All their projects come with step-by-step instructions and downloadable templates. Check out their 4th of July section! Just click here Disney Family.com


Another great craft resource is of course, Martha Stewart. There you can not only find instructions to easy crafts, but they have recipes, activities, etiqutte FAQ's and even some historical info on the 4th July. Click here to visit Martha Stewart.com


Wednesday, June 16, 2010

My Etsy

Ok,so it seams everytime I post a blog I begin by apologizing for not posting more often. Reality is I have a full time job, 3...actually 4 kids if you count my husband, I'm a Girl Scout Leader to my daughter's troop, have one dog and, oh, did I mention my full time job that always seems to follow my home! So I'm not apoligizing anymore...just thank God that I do have a life and I"m not clogging up your email with posts ever five minutes (I reserve that for my FB friends, lololol).

Now to the post of the day, My Etsy.
As I surfed the net one day I came to find http://www.etsy.com/. It's a network of crafters and artists who produce handmade goods and just by clicking on a few pages I fell in love with everything on there. I decided I had to be a part of this, so I signed up about 3 months ago. Now back to that having a life part...only in the past few days have I been able to focus, organize and get my shop up and running. As a favor, I ask you visit my shop, http://www.sinfullycrafty.etsy.com/ and let me know what you think! Critique the pics, my sale prices, descriptions,everything...it's the only way I'll know what needs improvement.

As a thank you I made this poster for someone who requested it, but they never came thru, so I'm sharing it with you guys. You can have it printed and framed just click on the picture below and then right click on the image and then click save as and save it to your computer.

And just for your info...the original Willy Wonka and the Chocolate Factory movie is my favorite of all time!

Thursday, June 3, 2010

My first love

Today I've decided to open up a little and tell you about my first love...no not the high school guy that stood me up for Prom (he's definitly not on my list!) or my wonderful husband who deals with my crafty craziness everyday. This love goes back a long time ago to when I was a five year old little girl just wanting to do what her father loved to do....taking pictures.

Rolleiflex 24611 Mini Digi AF 5.0 Camera (Black)I remember my dad having a Mamiya, dual lens camera which to me was fascinating because you had to look down into the camera to take pictures. He would often let me hold the camera, with his help because it was heavy, and "waste" film taking pictures of people, places & things. This is to be a love affair that will last the rest of my life....or at least up to now that I sit here writing this.

Needless to say that I moved on to attend a High School that specialized in Photography, studied it in College and have often made ends meet with it. Now I've decided to share some of my pictures with you and please, by all means, let me know what you think. And yes! I still have my dad's camera, although these pictures were taken with my Canon Rebel 35mm.

This series of pictures I took on my trip to England & Ireland. They feature Stonehendge, The Tower of London, Tower Bridge and the Cememtery in Glendalough. Want a copy of one of them, just stop by my Etsy shop.